Greenhouse Flooring, Heating and Staging !!!!!!

Greenhouse floors need to have excellent drainage. Floors can be made of concrete, stone slabs, brick, sand or even dirt. Gravel floors provide excellent drainage and can be used in conjunction with a weed barrier to keep weeds from growing up through the rocks.
Gas heat is more expensive to hook up initially, but in the long run it's more economical. A heater is especially important in colder zones, where a greenhouse may be heated for months at a time. A greenhouse needs to maintain a minimum temperature of 55 degrees for most plants.
Keeping your greenhouse cool is just as important as keeping it warm. If it gets too hot, the plants will suffer. This greenhouse uses an evaporative cooling system to keep temperatures down. It also helps keep inside air circulating: a key ingredient for healthy plants. Vents in the ceiling let hot air out when the temperature rises.
Staging areas are important in the greenhouse. These are places where tables and benches are set up to act as plant stands or work areas for potting plants, filling flats, etc. Staging areas give you more usable space.
Freestanding staging pieces are made from durable plastic and fiberglass, materials that are rust- and warp-proof. When setting up a freestanding staging area, leave a generous gap between the back of the staging and the side of the greenhouse to allow for air circulation. Freestanding staging can be moved around to accommodate different plants in different seasons and removed from the greenhouse when not in use.
In a greenhouse, using every inch of space is essential. A 12' x 12' greenhouse is fairly large, but it will quickly fill up once you add plants, shelving, lights and other accessories. The walls in this greenhouse are clear from floor to ceiling, letting light in on all levels, including the floor. You can also use otherwise empty ceiling space by hanging baskets.
To start new plants from seed, you can set up a propagation area. Naegeli
suggests using a germination mat because it heats the bottom of a seed tray and
thereby stimulates growth. Seeds need more warmth than other plants in the
greenhouse, so this is a very localized way to heat one area of the greenhouse
without raising the entire greenhouse temperature.
Water and Lighting in a Greenhouse!!!!!!

- Be sure the mainline that carries water into the greenhouse is sunk
underground at least four feet, which is below the frost line, to make sure the
water in the line doesn't freeze.
- Use a 3/4-inch poly pipe as the water supply line. Position it to run down
the length of the bench.
- From the main line, connect lateral lines to run between pots.
- Set the system on a timer to ensure regular watering.
Once the water system is in place, you'll need to address any lighting needs. Although fluorescent lights are popular, they help the gardener more than the plants. This type of lighting is good to work by, but plants need more light, especially in northern regions.
A high-pressure sodium bulb does a better job of simulating sunlight to stimulate plant growth. A 125-watt bulb gives off plenty of light when hung at least three feet above plants or seeds. This is a good distance to avoid heat burn.
Grow lights help to lighten shady spots and propagation areas in the greenhouse. What you are germinating or propagating determines how long you need to leave the lights on, usually an average of 12 to 16 hours each day. If you are growing tropical plants, you may need to set up grow lights if the plants don't get at least eight hours of sun each day.
Choosing a Greenhouse!!!!

Having a greenhouse means never having to give up gardening because of the weather. You can continue to propagate seeds and cuttings and grow a variety of plants from season to season. Having a home greenhouse is a dream for many gardeners, and there are many styles and sizes that fit most budgets and space considerations. When deciding on a style for your home, the sky's the limit. There are small solariums, medium-size greenhouses and larger structures like conservatories.
You'll find most greenhouses are made from aluminum, which is lightweight and weatherproof. Galvanized steel is also lightweight and very sturdy. You can also use wood, but be sure to choose pressure treated lumber, cedar or redwood for weather resistance. No matter which type of greenhouse you decide on, there are several considerations when choosing a building site:
Light
- Sun-loving plants need six hours of sunlight. Sites with less need supplemental light.
- A sheltered area is good, but too much shade results in poor growth. Look for trees, shrubs and structures that may cast shade.
- Southern exposure is best, east or west is okay, but northern exposure is probably too shady.
Exposure
- If the site is too exposed, it will be costly to heat in winter and keep cool in summer. Insulation can help in this situation.
- Protection from wind will keep the greenhouse sturdy longer.
- Too much shelter can mean not enough light.
Foundation
- Be especially careful to choose a level area where water doesn't collect.
- Many foundations are dug in and then filled with concrete.
- Plan ahead when possible; the less frozen, wet or snow-covered your yard is the easier it is to lay the foundation. Contractors can thaw frozen ground and move snow, but it costs more.
Proximity
- Putting a greenhouse against a house makes connecting water, gas and electricity easier.
- The area in front of the greenhouse should be clear of obstacles.
- The path leading to the greenhouse should be level and wide enough for a wheelbarrow. Be sure the ground is hard enough to withstand wheelbarrow traffic.
Materials
- Galvanized steel, which is lightweight, is sturdy and won't rust. It can withstand weight up to 100 pounds. It's also good for windy areas because it can withstand winds up to 70 miles per hour, making it a good choice for inclement weather.
- The greenhouse walls can be constructed from glass, which is heavy and can be expensive; film plastic, which is economical but not insulating enough for colder regions; or a rigid plastic, which is shatterproof and retains heat.
Assemble a Greenhouse Kit!!!!

eight 12-foot 4x6 landscape timbers
one box landscape spikes
10-pound bag white gravel
three 12-foot 4x4 posts
12 10-foot pressure-treated 2x4s
15 10-foot 1-1/4x6 pressure-treated decking
greenhouse kit
3-1/2 inch galvanized nails
air compressor with hoses
framing nailer
hammer
level
line level
measuring tape
pencil
power miter box
rakes
safety glasses
shovels
string line
-
Steps:
1. Greenhouse kits require a simple foundation, basically a perimeter of landscape timbers with a gravel floor. Based on the measurements given in the kit, make a square, level perimeter of 4x6 landscape timbers

2) Nail the landscaping timbers together and spike them to the ground using landscape spikes. Check for square by measuring opposite diagonals. When the diagonal measurements are identical, the box is square
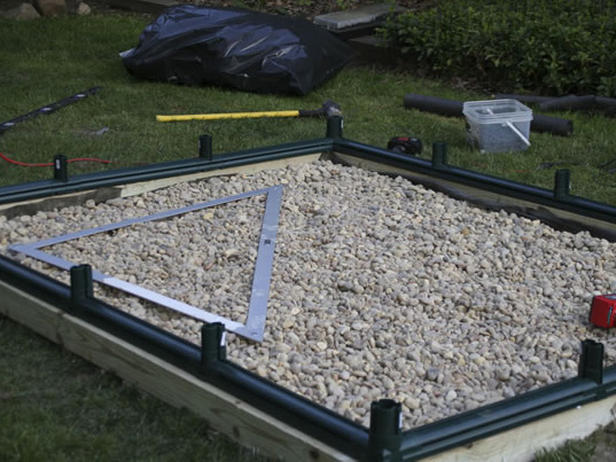
3) Lay down landscape fabric to eliminate the weeds, then dump in 4 to 6-inches of gravel. This will assist in drainage.

4). Following the manufacturers instructions, assemble the greenhouse kit

No comments:
Post a Comment