Thursday, 10 May 2012

Synthetic and Organic Chemicals

Learn the differences between synthetic and organic chemicals!!!!
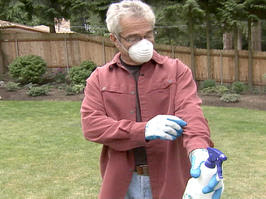
Millions of gardeners distinguish between synthetic and natural products by calling the former chemicals and the latter organics. The truth is they're all chemicals.The difference is that synthetic chemicals are man-made, whereas organic chemicals are derived from natural sources. As a result, most people think that all synthetic chemicals are toxic, and all organic chemicals are safe

In fact, there are organic chemicals that are every bit as dangerous as synthetic chemicals, yet people who use them assume – often incorrectly – that because something is labeled organic it must therefore be safe!!!

  • Regardless of which type of chemical you choose to use, make sure you read the product label carefully and follow the instructions. Don't assume that if two tablespoons per gallon is called for, then four tablespoons must be twice as good. It doesn’t work that way, and the results of using such a mixture can be dangerous to you and your plants.
  • Don't combine chemicals. In other words, don't mix an insecticide with an herbicide in an attempt to destroy both insects and weeds in one fell swoop. Certain chemical combinations can be dangerous.
  • Understand what the chemicals do. A number of organic chemicals are just as non-selective or indiscriminate as their synthetic counterparts. For example, Bacillus thuringiensis, or BT, the popular bacterial pesticide that controls caterpillars, doesn't distinguish between the larval form of the destructive cabbage looper and the monarch butterfly. It kills them both. The same is true of garlic oil, a popular organic insecticide that is equally effective against both pests and beneficial insects.
  • Whether you use synthetic or organic chemicals in your landscape, take physical precautions. Wear a long-sleeved shirt, long pants, gloves, and perhaps even a mask. And when you've finished spraying or dusting, wash your hands thoroughly.
  • solution!!!!

    Synthetic Chemicals, Compost and Your Soil

    To have healthy soil, ditch the synthetic fertilizers and bring on the compost.

  • The secret to successful gardening is healthy soil. In a single tablespoon of healthy soil, there are literally billions of organisms — from protozoa and nematodes to bacteria and fungi — that together form interdependent food chains.
    In other words, the soil itself is a living organism, and it needs to be treated as such. But every year many gardeners destroy the vital soil food web by using synthetic chemicals, specifically synthetic fertilizers.
    The frequent use of synthetic fertilizers leads to an accumulation of soluble salts, and those salts are toxic to the organisms of the soil food web. That leads to a variety of problems, including decreased soil fertility, a lack of vigor, lower yields, reduced flowering and greater susceptibility to pests and diseases.
    So if you've been relying on synthetic fertilizers, consider making the switch to organic products, and use the one thing that can keep your soil healthy: compost. Compost teems with all the organisms that make up the soil food web. When applied routinely to the soil, whether around the base of plants or spread evenly over an entire garden bed, compost makes soil come alive. And in the process, it creates conditions that lead to healthier, happier plants with amazing vigor and the ability to ward off pests and diseases


Friday, 4 May 2012

The Right Way to Plant a Tree

Plant Properly!!!!!

You can plant trees the easy way -- just dig a hole and drop it in -- but your big investment may not make it through the spring or summer if you don’t get it right the first time

For a tree that will last, plant it properly

Tree Selection !!!!!

Do some homework and pick the right tree for the location you've selected.
 

The type of tree you choose should be based on the attributes of the location and what functions you want the tree to serve. Remember that a tree is a long-term investment. Consider these factors before you plant:
Size
Privacy
Shade
Color
Fruiting
When selecting a tree at the nursery, here are some things to look for:
Does the tree have desirable branch angles?
Are there dead or dormant branches?
Is the sapling the appropriate size for the container it's in?
Is the tree root-bound? Carefully remove the tree from its container (or ask your nurseryman to help you) and check the condition of the roots. Look for evidence of "girdling." Roots circling around the perimeter of the container, surrounding the trunk, can eventually choke and kill the tree.
Location for Planting
Plant the right tree in the right location to save yourself unforeseen trouble down the road. Trees grow large--up and out. Know your needs. Are you planting near the driveway, pool or another tree? All are important considerations since trees shed leaves, branches, fruit or seeds, etc. Root invasion (such as into underground pipes) can cause costly damage to your property and shorten the life of a tree.

Planting Technique !!!!!

Here are the basics steps for planting your tree "pedestal style" as shown in the demonstration.
Before you dig, make sure that the spot you've chosen for your tree does not have any underground lines that would endanger you while planting.
A common mistake when planting a tree is to simply dig a large hole and add amended soil into the hole. This tends to cause a "container effect" on the tree's roots as they grow to the edge of the amended soil then begin girdling around the perimeter of the space. This can ultimately lead to the tree falling over in a high wind because the tree hasn't been able to properly anchor itself with its roots. A better technique is to break up or cultivate the soil in a circular area around the location where the tree is to be planted. First, dig a whole that's the depth and diameter of the plant's container. Remove and discard grass and weeds from the planting site. Then break up and the soil around the hole so that it's loose.

Loosen the Root Ball!!!!


Prepare the root ball for planting
With the hole dug and the soil around the hole thoroughly cultivated, carefully remove the tree's root ball from its container, and using your hands, gently loosen any outside roots from the sides and bottom, taking care not to break or damage the root ball

Place the Tree!!!!!

Place the root ball in the center of the hole.
Place the tree in the center of the hole on the undisturbed pedestal so the root crown (where the trunk meets the roots) is about 1-1/2 to 2 inches above the surrounding ground level.

Remove the Stakes!!!!!

 If your tree came tied to a nursery stake, remove the stake.
If your tree came tied to a nursery stake, remove the stake. Another common mistake, according to Beeler, is over-staking trees. If your tree is sturdy enough to hold itself upright, do not re-stake it. If the tree needs help to stand upright, use two stakes and ties. Place the stakes on opposite sides of the tree, planted outside the area you just cultivated, approximately 18 inches from the trunk. Place tree tape loosely around the trunk and attached to the stakes with ties. The ties should be loose enough to allow the tree to move back and forth slightly in high wind.
Backfill the hole with the soil you removed. Discard any grass and weeds from the soil. Do not add soil amendments.


Finishing Touches!!!!

Finish backfilling the hole, but remember not to cover the top of the root ball, which is the root crown stake.
Create a circular berm around the base of the tree to help contain water and channel it to the tree's roots.
Water thoroughly right after planting, soaking the planting area. This will help get the roots established and settle the soil
Spread mulch or wood chips about 6 inches deep over the entire planting area, leaving a bare 4- to 6-inch area directly around the trunk.
If you did have to stake your tree, periodically check the stakes and ties to ensure that they are not harming the trunk or branches. The tree should be able to stand on its own after one year.
Tree Survival Tips: What to Avoid
Here are two of the more common situations that cause newly planted tree saplings not to survive--and tips for avoiding each problem.
Drowning. Check root moisture for newly planted trees. Don't be fooled by surface soil conditions: check the soil 4 to 6 inches deep. The soil should be moist, not soggy. One effective means for watering, and one which wastes less water than using sprinklers, is to place the end of hose against the trunk and let the water drip all day or night.
Suffocation. Avoid planting too deeply. The root crown (where trunk meets the roots) should be 1-1/2 inches to 2 inches above ground level.

Sunday, 29 April 2012

No-Frills Composting!!!!!

Howto turn garden waste into gold.!!!!

Finished compost is the best soil enricher — and it's easy to make
When you pile organic material and let it sit for a little while, the rotting process turns those scraps into compost. Finished compost is the best thing in the world for anything that grows. When you lay it on the soil surface, you're feeding the soil (rather than the plant). The soil will drain better, and the compost will attract earthworms and microbial activity in the soil. And with the wealth of nutrients in compost, you can skip using fertilizers altogether if you routinely apply compost.
Maria originally placed her compost pile under a shady tree. Unfortunately, the roots will suck the nutrients right out of her pile, so Paul suggests moving it out into the sun, several yards from vegetation.
To contain the pile requires nothing more than a wire cage with enough area to generate sufficient heat — at least a 3' x 3' cage.
Broken twigs make for a good base. The coarse material allows air flow and drainage at the bottom of the pile.

Next come the leaves. Over time they produce what's called leaf mold, which helps break down plant tissue into compost. A mix of green and brown materials is best. Brown is dry, carbon-rich trimmings like old leaves and twigs. Greens is nitrogen-rich debris like grass clippings and annuals.

This lump of new, coarse material will take a while to decompose, but there's a trick to speeding the process — blood meal. A cup or so accelerates decomposition. An alternative to blood meal is finished compost, which already has the bacteria and micro-organisms that help a compost pile get started.
It's also important to sprinkle water onto the pile, enabling microorganisms to do their thing. Not too much, though: The pile should be about as moist as a wrung-out sponge.
Building the compost over time means repeating the whole process — add material, then a little blood meal, then water.
 step above the wire cage is the self-contained compost bin. A lid helps contain the materials, and a door on the bottom of the bin comes in handy when the compost is ready to be used. Expect usable compost from a bin like this in two to three months.
Another high-end compost option is the tumbler. It's designed in such a way that you turn it every day, which helps generate compost more quickly.
Arguably the best thing in the world for compost piles are kitchen scraps. They contain all kinds of great nutrients that will break down. The only things you want to keep out of the pile are fatty foods and meats, which attract rodents.

Assembling a Compost Bin!!!!

The bin itself is a simple structure consisting of metal corner posts onto which you attach boards. The boards are ideally made of rot-resistant lumber, such as cedar or redwood. You could also use spruce or pine, but in that case, you should treat the boards with a non-toxic preservative. The boards are angled inward, which helps funnel the rain into the bin, and there's sufficient space between them to allow for good air flow.
The dimensions of the bin are ideal. Unless a bin is large enough, it won't generate enough heat to drive decomposition. The manufacturer recommends that the bin be 4 feet square, but Paul decided to make his a little bit bigger, as in 5 feet by 4 feet.
Assembling the bin is easy. The boards simply slide into the posts and are attached using the supplied screws. The top three boards at the front of the bin are not attached, however, so that you can easily remove them to access the interior of the bin. Start to finish, Paul put this bin together in just 30 minutes by using a cordless power drill.
Finding the right spot
Deciding on a location for a compost bin can be challenging. First and foremost, a compost bin needs to be conveniently located or you'll never use it. It also needs to be clear of trees, whose roots will invade the rich material and suck the nutrients right out of it. Placing the bin near a water source is a good idea as well, because periodically you'll need to give it a shot of moisture. Finally, it needs to be in a spot that gets at least a half day of sun or it won't heat up properly.
After examining his two acres for a good spot, Paul realizes that he doesn't have a single location that fits all those criteria. So he must compromise on a spot that's convenient, is near water and gets a good deal of sun. Unfortunately, there's also a large tree nearby, but that's okay because he ultimately plans on having the tree removed to make room for a new greenhouse.

Establishing the compost pile
Once the location for the compost bin has been determined, it's time to get rid of the grass. A compost pile or bin needs to sit on bare soil so that soil organisms, like earthworms, below can work their way into the pile and do their magic.
When the grass has been removed, place the bin on the ground and begin filling it. Paul begins with a small bale of straw, followed by a mix of leaves, old potting mix, grass clippings and other organic matter that he has collected over the past few weeks.

Then he activates the pile with a shovel full of compost. Remember, compost should contain a mix of carbon-based materials — best thought of as brown stuff, such as straw and leaves — and nitrogen-based materials, or the green stuff, such as grass clippings and kitchen scraps.
In his case, Paul has more brown stuff than green stuff, so he sprinkles the pile with blood meal, which is pure nitrogen, just to balance things out a bit. Then he adds water to get the right moisture content — not too wet, but definitely not too dry, either — and fluffs the pile with a fork. Now he is ready to add more things to the compost pile
Cold frame
A cold frame allows Paul to get a jump on spring planting and extend his growing season into the fall and winter. In summer he replaces the clear poly film with shade cloth to protect plants from the blazing sun.
He bought two of these frames, and they were fairly easy to install. The kit, which is designed to fit a 4' x 8' bed, comes complete with galvanized steel stakes, rafter pipes, poly film and all of the necessary hardware.
All you do is drive the tapered end of the stakes into the ground with a hammer. Then join two sections of pipe together, and slide their ends into the stakes. Next, lay the poly film over the sections of pipe and attach it using the special clips provided.
Inside the cold frame, fall veggies will be protected even when the ambient air temperatures drop to about 25 degrees F. During warm spells in the fall season, roll up the poly film on the sides of the cold frame and attach it with tape to allow more air flow through the frame and prevent the veggies from cooking inside.


In winter, once the veggie harvest is over, he'll use these cold frames to house his bonsai collection. To do this, he'll place the bonsai in the beds and cover them with pine bark mulch or shredded leaves up to the tops of the pots. Then, when warmer temperatures arrive, in about late February or so, he'll remove the bonsai and get ready to plant more veggies. In the spring, he'll be able to get at least a two-week head start on the growing season

Tuesday, 24 April 2012

How to Plant a Kitchen Herb Garden

Have some extra space in your yard or garden? Plant a fresh and simple herb garden only steps away from the kitchen!!!

Suggested Herbs

basil ('Purple Ruffles' or 'Dani')
sage
oregano
common thyme
sweet marjoram
lavender
rosemary
parsley
chives
cilantro

Pick a Location

Pick the location for your herb garden. An ideal location would be a few steps from your kitchen, but any spot that gets about six hours of sun a day is good. If you have space in front of a kitchen window, plant the herbs in small containers for an indoor garden

Prepare the Area for Planting


Prepare the area for planting by loosening the soil. If the soil is compacted or consists of heavy clay, improve drainage by adding some compost, peat moss or coarse sand. Work the material into the top foot of soil before you plant. Tip: Plant early in the morning or late in the afternoon to prevent the transplants from wilting in the midday sun

Dig Planting Holes

Because you are starting herbs from bedding plants and not seeds, you will need to create larger planting holes. Dig each hole to about twice the width of the root ball of the new plant.

Add Plants to Soil

Space the bedding plants about 18 inches apart to give them room to spread out and grow. Tip: Place taller herbs, like sage, rosemary and marjoram, toward the back of the garden, and place parsley and cilantro at the front.

Label Herb


Add labels to each of your freshly planted herbs to make them easy to identify when cooking.

Surround With Flowering Plants


For accents of color in your herb garden, add flowering plants like zinnias and salvia. Tip: Plant perennials on one side and annuals on the other for easier replanting next year.

Water Regularly


Give the new transplants plenty of water. Once established, make sure your herbs get an inch of water each week throughout the growing season

Harvest Mature Herbs


Begin harvesting from the herbs as soon as they are mature, but take only a little bit each time you harvest. If you remove more than a third of the plant at one time, it takes longer to recover and produce new foliage. To promote branching, keep the tops of the plants pinched back in early summer. With judicious picking, most herbs can be harvested for several months. Tip: Fresh herbs taste best when harvested in the morning. Also, herbs are most flavorful if harvested before they bloom


Thursday, 19 April 2012

How to Use Annuals for Color Next to a Fence or Walkway

Plant taller in the back and shorter in the front to provide shade and visual interest in an annual garden next to a walkway or fence!!!!

Highlights:

Step 1: Go with Color

Choose brightly colored annuals. Violas are almost always a good option since they will thrive in almost any U.S. climate. One of the ways professional garden designers boost the intensity of their plantings is by grouping colors together in large masses. Remember that colors lose impact if they're spread far apart.

Step 2: Check the Roots

Before you buy annuals, be sure to check the condition of the roots. if you find individual or fleshy roots around the outside of the root-ball, don't buy the plant. By comparison, a younger plant's root-

Step 3: Spade the Soil and Add Compost

Properly prepare the soil by spading the entire plot. We recommend a spading fork rather than a shovel. Add 3" to 4" of compost to the plot. Mix in the compost with the soil and rake smooth.

Step 4: Arrange the Plants

Position your plants before planting to determine the desired layout. Always plant from back to front to avoid having to walk over plantings. Space plants tightly, nearly root ball to root ball. This is usually an unorthodox approach, but annuals don't live long enough for their growth to be a concern. Tight spacing also allows for one plant to die without leaving a noticeable gap. Offset the rows of plants to avoid any appearance of a grid design. The design should be natural and flowing.
ball is still mostly dirt.
 

Step 5: Dig Deep

Be sure to dig a deep enough hole so that the entire root ball is covered

Step 6: Water While and After Planting


Be sure to water the entire bed after planting. If you notice any wilting before you've finished planting, stop and water that section. If you are watering during the day, take care to avoid getting water on the foliage. Water on foliage with the sun shining can act like a magnifying glass and damage plants

Step 7: Make Color Last


The key to long-lasting beauty in annuals is the prevention of seed production. When a plant starts producing seeds, it slows its metabolism, quits blooming and even dies. For example, after an annual like this marigold has bloomed (Image 1), the bloom fades (Image 2) and then dries out (Image 3). If the flower reaches this final stage, the plant will react as if the season is over and it will begin seed production. To prevent this natural process from occurring and to keep the plant blooming, check your plants every day and clip off any faded blooms. This simple step will pay enormous dividends in maintaining the color of your plantings for as long as possible

Step 8: Give Good Nutrients

The key to keeping annuals healthy and in bloom is consistent nutrition. Fertilize with half of the manufacturer's recommended dosage, but doing so twice as often. Fertilizing generously and regularly gives annuals a stable diet, encourages more consistent blooms and will keep this finished project looking beautiful. Make sure to thoroughly mix the water and fertilizer so that the fertilizer doesn't simply settle at the bottom of your watering can.

Step 9: Water after Fertilizing


Water the bed after fertilizing so that the nutrients are sent deep into the root zone. This technique will make any fertilizer you use more effective. You should fertilize your annuals every two weeks.

Step 10: Add Pots

Adding potted plants can gave your bed more visual interest. Think of pots as pieces of art, the equivalent of adding the right sculpture or painting to a room. For example, cobalt blue pots provide will contrast within the layout and help accent the beauty of the plantings


Sunday, 15 April 2012

How to Compost and the Different Types of Compost Bins

Learn about the different types of compost bins and what household items can be composted!!!!

Composting is the natural breakdown of organic matter to produce a crumbly nutrient-rich soil. The resulting compost can be added to other soil types as a fertilizer, forming an excellent growing medium for plants. By managing this natural process in your own garden, you can dispose of waste, and produce an agent that will improve the look and yield of any plants and flowers. Regardless of the size of your outdoor space, there will be a composting solution to suit your needs.

Making Compost!!!

Theories vary on how to produce the perfect compost, but there are some general rules. Firstly, a suitable container or store is required. Different types and designs are shown here, including homemade, shop-bought, and recycled varieties. As the natural process of composting generates heat, storing compost in a container enables the heat to be retained more easily, and allows for the efficient breakdown of material. It is best to keep a compost heap covered to retain this heat, and to prevent rain from making the compost too wet. While some moisture is needed, it is usually supplied in the form of moist grass cuttings and other green waste

Building Up Layers!!!!

A system of layering different materials will aid the composting process and enhance the finished product. A layer of coarser, more fibrous material, for example, will introduce air to the center of the heap, which is vital as composting is an aerobic process. However, this may not always be a straightforward task. In the height of summer, for example, the majority of layers are likely to be grass clippings, so it is important to make sure you break up large amounts of one material with other layers—perhaps from the kitchen.
The process of composting takes between two and nine months. You will need to gain access to the base of the heap to take out the crumbly, fully decomposed compost for use on the garden. Some containers have an access hatch at the bottom of the container, while others may need one side to be disassembled so that the bottom level of compost can be dug out.
Slatted bins are great for gaining access to the bottom of the heap. The sides are easily disassembled, and the compost is normally integrated enough not to spill out (image below).

The Different Types of Bins!!!!

Purpose-built plastic bins are fitted with a hatch at the bottom for easy access of composted material (image 1). A slatted wooden bin encourages greater air circulation, improving the ventilation of the heap (image 2). A wooden sectioned bin can be disassembled in layers, allowing the heap height to be raised or lowered as required (image 3). As well as looking attractive, a hurdle-style compost bin offers good ventilation. The heap is accessed by removing one side (image 4). A concrete bin may have a block or slatted structure. Unlike its wooden alternatives, it will not rot (image 5). Large recycled containers, such as those used to deliver building materials, make ideal compost bins (image 6).


Wormeries!!!!

A wormery performs the same task as a compost heap, but on a smaller scale. Worms are kept inside a suitable container, where they eat organic matter; their waste products are then used as a fertilizer. Tiger worms are best for the job, as they live and feed on decomposing compost (unlike common earthworms, which prefer to burrow in soil). You can make your own wormery, or buy a kit that comes with a supply of tiger worms.Composting is the natural breakdown of organic matter to produce a crumbly nutrient-rich soil. The resulting compost can be added to other soil types as a fertilizer, forming an excellent growing medium for plants. By managing this natural process in your own garden, you can dispose of waste, and produce an agent that will improve the look and yield of any plants and flowers. Regardless of the size of your outdoor space, there will be a composting solution to suit your needs.Theories vary on how to produce the perfect compost, but there are some general rules. Firstly, a suitable container or store is required. There are different types and designs, including homemade, shop-bought and recycled varieties. As the natural process of composting generates heat, storing compost in a container enables the heat to be retained more easily, and allows for the efficient breakdown of material. It is best to keep a compost heap covered to retain this heat, and to prevent rain from making the compost too wet. While some moisture is needed, it is usually supplied in the form of moist grass cuttings and other green waste.

Materials That Can Be Composted

The complete list of items that can be composted is extensive, but it can be categorized generally as either brown waste or green waste. Although all organic matter will compost, it is advisable not to compost items that may attract vermin or disease.

Green Waste Items for Composting

As the name suggests, this category includes all types of green leafy garden waste. Other types of fast-rotting waste material is also included in this group. All these items have a high nitrogen content
Example Ingredients:

  • Fresh grass clippings are a plentiful summer supply and should be layered with other items.
  • Flowers - stems should be chopped up; don't use diseased plants.
  • Nettles act as good natural activators.
  • Vegetable and fruit peelings can be added straight to the heap from the kitchen.
  • Vegetable crop residue, such as potato and tomato plants.
  • Young weeds, but avoid perennials.
  • Herbivore manure, such as from horses, cows and rabbits.
  • Tea leaves, but tea bags will take longer to break down.

Brown Waste for Composting


This category refers to the slower-rotting items that have a high carbon content.
Example Ingredients:

  • Dead or fallen leaves - use only small amounts
  • Shredded paper
  • Coffee grounds and filter - use only paper filters
  • Cardboard torn into small pieces
  • Woody hedge clippings and twigs ideally put through a shredder
  • Sawdust mixed well with more aerated material
  • Herbivore bedding, such as hay and straw

Other Items for Composting


There are a number of other items that are not immediately obvious candidates for composting but that are nevertheless suitable.
Example Ingredients:

  • Egg shells washed and crushed up
  • Hair - either human or animal hair since both are high in nitrogen
  • 100 percent wool or cotton cut into small pieces or tumble-dryer lint
  • Vacuum-bag contents, but use common sense as to what has been picked up
  • Wood ash in small quantities

Items Not to Compost


Although all organic material breaks down, avoid the following as they may attract vermin and harbor potential pathogens:

  • Meat and fish (cooked and raw) can harbor disease and attract vermin.
  • Dog and cat feces can harbor disease.
  • Cat litter will normally contain feces.
  • Glossy magazines contain too many inorganic chemicals.
  • Barbecue coals and coal ash contain harmful sulphur oxides


Thursday, 12 April 2012

Mulch Matters!!!!

Trees, shrubs and plants could vote on what covers their feet, it would be mulch every time. Not only do mulches dramatically reduce evaporation of water from the soil surface, but by reducing weeds they help prevent competition for water. As a result, soil moisture stays more constant and roots grow better.

Organic mulches save a bit more water than stone mulches, but just about all mulches do a good job. And almost any soil cover is better than none at all.


On bare soil, two-thirds of the water we applied was lost through evaporation. "When the soil was mulched, only 10 percent of the water was lost from evaporation." We recommends using a mulch that has both large and small pieces so that it will receive water well and also won't easily float or blow away. Use mulch on potted plants too.

So mulch is good. But what kind of mulch? And how much?

Organic or Inorganic?
The Anasazi Indians in the ancient Southwest successfully gardened in arid land, thanks to the gravel and rocks they placed on the soil's surface. Inorganic mulches--rocks, gravel, marble, brick chips--conserve water and shade the soil, but they don't improve it.
Use those mulches in fixed landscape beds that you don't plan on redigging and replant-ing. Small gravels migrate easily, working their way down into the soil. Even fairly large rock or brick nuggets can wash or get kicked out of their landscape beds.

No matter what kind of soil you have, an organic mulch is bound to eventually improve it, even if it never gets turned in. "Organic matter is the magic elixir"

"It does good things for poor soils of almost any type. If the mulch stays on top, the change will happen more slowly, but earthworms and microorganisms will slowly break it down and mix it in. And of course every time you disturb the bed in any way, such as when you're planting annuals, it happens much faster."
Organic mulch adds fertility to sandy soils and helps hold water and nutrients; it loosens and helps drain heavy clay soils; it adds micronutrients that might be missing from even a good garden loam.
The organic mulches highest in lignin--an organic compound in woody plants--take the longest to break down. Bark has more lignin than wood, so bark mulches last longer than wood mulches. Cypress and pine straw last almost as long as pine bark.
 
Also, the faster the mulch percolates water and the drier it stays, the longer it lasts. "Pine-bark nuggets will last a long time,"."There's a lot of air space between the nuggets, and the microorganisms don't have enough moisture to break them down."
Dark or Light?
Mulch cools the soil by either absorbing heat from the sun and not transferring it to the soil (dark organic mulch, such as bark and wood) or reflecting the heat (light mulch, such as rocks or light-colored woods) so that it's not passed down to the soil below. In most cases that's good, because overheated roots don't have to work so hard.

In very hot or sunny areas, however, the heat radiated from the mulch can do a number on sensitive plants. Roger Kjelgren, associate professor of urban horticulture at Utah State University in Logan, has found that on a summer day dark-bark mulches can reach temperatures of 140 to 150 degrees F--hotter than asphalt. Since heat rises, that means plants can shut down and stop growing. The plants most prone to suffer? Those with large leaves and any that prefer partial shade or that can't tolerate heat.
"It depends on the extent of the mulch area," says Kjelgren. "In a large area of mulch, putting an oakleaf hydrangea out there would probably fry it. Over time, as the plants that do well establish sufficient cover, the mulch becomes shaded."
So if you're planning to use bark mulch in a sunny bed, make sure the plants are heat tolerant. This is especially important if the mulched area is large and the plants are young and small. Most inorganic mulches don't get as hot because they transfer some heat to the soil below. The exception--lava rocks--heat up almost as much as bark mulch.
Remember, too, that as winter approaches, a sunny day could interfere with the plant's adjustment to cold. Dark mulch can absorb the heat during the day and release it at night, which may interfere with the plant's adjusting to cold winter temperatures.
How Should It Smell?
If you're buying mulch from large piles that may not have been turned in a while, make sure you give it a sniff test first. Good mulch has a clean smell like fresh-cut wood or soil. The odor of vinegar, ammonia, rotten eggs or silage means that the mulch has gone sour--a toxic condition that results from too much moisture and too little oxygen. Sour mulch can seriously damage and even kill plants within 24 hours after application.

Can Mulch Change Soil pH?
Most people believe that mulches like pine straw and pine bark will turn the soil acid below. Actually, that's true only some of the time. Some soils--such as clay and those with plenty of organic matter--are extremely resistant to change. Many studies have shown little or no effect on soil pH, even with pine straw on an already acid soil. "If you've got a material that's acid or alkaline "it will probably have a bit more impact on sandy soil than on a clay soil

How Much Is Too Much?
You can easily suffocate a plant by mulching too deeply. The same goes for laying any impermeable cover--such as plastic or several layers of cardboard--that doesn't allow the soil to breathe."If you keep gas exchange from happening, that's where you run into trouble. You stick your finger under there, and you've got a swamp. It smells sour, and there's anaerobic activity. That's when you get into root problems."
The less porous and more compactable the mulch, the thinner you spread it: for very finely shredded hardwood, no more than two to three inches deep; coarse nuggets, three to five inches; loose straw, up to six inches deep for wintertime protection of sensitive plants. Top off aging or discolored mulch with a minimum of new material
How Close Should I Mulch?
Don't give wood borers and other insects easy access to your trees, shrubs and herbaceous plants: leave a space of eight inches between mulch and tree trunks or tender stems. Also be sure to keep wood products (and possibly termites) away from your home's foundations.
Is It OK to Use Sawdust?
Sawdust is fine to use as a mulch as long as it's aged and composted first to get rid of heat buildup. Because it ties up nitrogen at the soil surface, don't use sawdust around heavy feeders and plants that have roots close to the surface.
But you also have to know its origins, "Does it come from treated wood? If so, some of the preservatives are toxic and also have the potential to leach. Also, is there any black walnut or other material harmful to plants?"
How to tell if it's aged enough? "It will look discolored, more amorphous and more humusy. You might still be able to recognize it as sawdust, but it looks very much degraded." Cypress and redwood sawdust degrade very slowly.